Practical 6 - Keyframe Animation

Objectives:
Understand keyframes, linear interpolation, transformation interpolation
Build your own keyframe classes
Prerequisites:
Practical 3 - Hierarchical modeling needs to be finished, as we will use the
Nodeclass
Principle
Keyframe animation is a widely used technique to describe animations, by which the animator or designer of the animation specifies the position of the animated object for specific frames, and lets the machine interpolate between them for any other times than those specified. The specified object poses are called key poses.
Let’s illustrate the keyframe process for a 1D point described by a x coordinates:
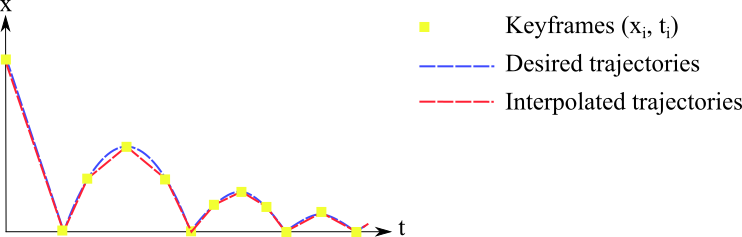
Imagine that you want to animate a bouncing ball. You have in mind the trajectory of this ball (the blue line) but you do not want to specify manually the position of the ball at each frame. Instead, you discretize the trajectory into keyframes (the yellow squares), which means that you specify the position of your object at specific times. By linearly interpolating the position of your object between the keyframes, you can approximate the trajectory you wanted (red line). The more keyframes you have, the more control you have (but also the more work you have to do!).
For a time \(t \in [t_i,t_{i+1}]\), the position \(x\) of the point is linearly interpolated between the corresponding keyframed positions \(\{x_i, x_{i+1}\}\):
with \(f = \frac{t - t_{i}}{t_{i+1} -t_i} \in[0,1]\).
Such interpolations are quite efficient since they are linear. This is why we use as much as possible linear interpolation to achieve real-time or interactive performance.
Exercise 1 - Interpolator class
Let’s implement a small, generic Python class providing the above functionality.
It will work for any type of values that have \(+,-,\times\) operators,
including numbers and vectors, provided you pass the interpolation function as
constructor argument. We provided the simple lerp() linear interpolation
function in the transform.py module given
in Practical 1, which interpolates between any two values of any given
numerical or vector type, using the above interpolation expression.
Download animation.py and fill in
the holes in class KeyFrames:
class KeyFrames:
    """ Stores keyframe pairs for any value type with interpolation_function"""
    def __init__(self, time_value_pairs, interpolation_function=lerp):
        if isinstance(time_value_pairs, dict):  # convert to list of pairs
            time_value_pairs = time_value_pairs.items()
        keyframes = sorted(((key[0], key[1]) for key in time_value_pairs))
        self.times, self.values = zip(*keyframes)  # pairs list -> 2 lists
        self.interpolate = interpolation_function

    def value(self, time):
        """ Computes interpolated value from keyframes, for a given time """

        # 1. ensure time is within bounds else return boundary keyframe
        ...

        # 2. search for closest index entry in self.times, using bisect_left
        ...

        # 3. using the retrieved index, interpolate between the two neighboring
        # values in self.values, using the stored self.interpolate function
        return ...
Usage of this class is as easy as it gets, if you want to specify a scalar 1D animation as discussed above, of value 1 for time 0, 7 for time 3, and 20 for time 6, you just need to pass the keyframe associations as a dictionary:
my_keyframes = KeyFrames({0: 1, 3: 7, 6: 20})
print(my_keyframes.value(1.5))
Time 1.5 falls in the middle of key times 0 and 3, so the expected printout of
the execution above is \(0.5 \cdot 1 + 0.5 \cdot 7 = 4\). It also works for
vectors, try different things out! Using the provided vec() shortcut
function to construct numpy vectors, for example:
vector_keyframes = KeyFrames({0: vec(1, 0, 0), 3: vec(0, 1, 0), 6: vec(0, 0, 1)})
print(vector_keyframes.value(1.5))   # should display numpy vector (0.5, 0.5, 0)
Interpolating transformations
If you want to control the motion of objects, you need to provide keyframes for their geometric transformation matrices. A good keyframe system is then expected to interpolate between those keyframed transformations to compute transformation matrices at any given time.
Well, how can we interpolate between two transformation matrices?
Linear interpolation limitation
Let’s have a look at the two following matrices. One is the identity matrix and the other one represents a rotation of 90 degrees around the x axis:
Now, suppose we want to interpolate between these two matrices, in order to create an animated rotation. Half the way, we expect the transformation to be a 45 degree rotation around the axis x, something like this:
However, if you naively use linear interpolation, you get something else.
What do you get for this example if you feed it to our KeyFrame class
which uses lerp()?
Decomposing the transformation
To correctly interpolate geometric transformations, a common solution is to decompose transformations into three components (translation, scale and rotation) and interpolate each of them separately.
A transformation matrix \(M\) can be composed as follows:
with homogeneous matrices created out of:
To interpolate between keyframes, one just has to interpolate each component T, R and S then recombine them to get the model matrix. T, R, S is the preferred order used in animation systems, also being the easiest to handle manually, it means scale is applied first to points, then rotation around the object origin, then finally the scaled and rotated version of the object is repositioned through a translation.
For scale and translations, linear interpolation is fine. However, we still need a correct way to interpolate rotations since linear interpolation of matrix rotations doesn’t work, as previously illustrated. Quaternions are the solution.
Quaternions for rotations
We will not give much details about the quaternion theory, since this is not the purpose of this practical lesson. You may find more background in the lectures, and numerous resources are available. Any 3D rotation can be expressed as the rotation around a unit axis \(v = ( v_x , v_y , v_z )\) with an angle of \(\alpha\). This rotation can be represented by the unit quaternion (4×1):
Two rotations can be easily combined as the product of two quaternions.
The nice thing is that quaternions help define a spherical linear interpolation (slerp) of two rotations defined by quaternions \(q_1\) and \(q_2\), which nicely interpolates between two rotations as wanted. Slerp is defined as follows:
The only thing to ensure, however, is that a quaternion must be of unit length to represent a valid rotation.
Exercise 2 - Transform keyframes
We provide the quaternion_slerp() function as part of the transform.py
module. Fill in the TransformKeyFrames class in animation.py
for geometric transformation keyframes,
which of course can use objects of the KeyFrames class to perform most
of the work; you will also need quaternion_matrix() which converts a
quaternion rotation to a \(4 \times 4\) rotation matrix:
class TransformKeyFrames:
    """ KeyFrames-like object dedicated to 3D transforms """
    def __init__(self, translate_keys, rotate_keys, scale_keys):
        """ stores 3 keyframe sets for translation, rotation, scale """
        ...

    def value(self, time):
        """ Compute each component's interpolation and compose TRS matrix """
        ...
        return identity()
One can then write a special type of scene graph Node object whose local parent
transform is controlled by transformation keyframes, and where the time is the
actual elapsed time in our application, provided by glfw.get_time().
See the KeyFrameControlNode provided in animation.py:
class KeyFrameControlNode(Node):
    """ Place node with transform keys above a controlled subtree """
    def __init__(self, trans_keys, rot_keys, scale_keys, transform=identity()):
        super().__init__(transform=transform)
        self.keyframes = TransformKeyFrames(trans_keys, rot_keys, scale_keys)

    def draw(self, primitives=GL.GL_TRIANGLES, **uniforms):
        """ When redraw requested, interpolate our node transform from keys """
        self.transform = self.keyframes.value(glfw.get_time())
        super().draw(primitives=primitives, **uniforms)
You can then add keyframe controlled nodes in your scene in main() to
control object transforms. Test it and have fun! For example, for the keyframed
animation of a cylinder object:
def main():
    """ create a window, add scene objects, then run rendering loop """
    viewer = Viewer()
    shader = Shader("color.vert", "color.frag")

    translate_keys = {0: vec(0, 0, 0), 2: vec(1, 1, 0), 4: vec(0, 0, 0)}
    rotate_keys = {0: quaternion(), 2: quaternion_from_euler(180, 45, 90),
                   3: quaternion_from_euler(180, 0, 180), 4: quaternion()}
    scale_keys = {0: 1, 2: 0.5, 4: 1}
    keynode = KeyFrameControlNode(translate_keys, rotate_keys, scale_keys)
    keynode.add(Cylinder(shader))
    viewer.add(keynode)

    # start rendering loop
    viewer.run()
Notes and further improvements
Implement a keyframe animation in your project
Control other aspects of your animation with keyframes, such as rendering color or parameters. You can pass interpolated values as uniforms.
Animation time can be reset to zero using
glfw.set_time(0). The space key is assigned to this function in the viewer.
Elements of solution
We provide a discussion about the exercises in Practical 6 - Elements of solution. Check your results against them.